
Six tips for planting early potatoes
2 Minute Read
Roasted, mashed, steamed, or baked, growing your own potatoes is just as rewarding as enjoying them alongside your favourite meal. In addition to being easy to grow, homegrown potatoes require little maintenance, too.With minimal essentials and straightforward methods required, potatoes can thrive in the smallest or largest of gardens, so keep reading for six simple steps to cultivating your own batch of potatoes at home.
From plant to plate: The simple joy of growing your own potatoes
Potatoes are easy to grow, can withstand light frosts and are typically sown from the start of spring. You've probably heard of early, second early and maincrop potatoes, first and second earlies are 'new' potatoes and are less prone to potato blight as they are generally harvested before the disease sets in, they also take up less space and have a quicker turn around time to harvest.Maincrop potatoes are larger, take longer to mature, and are suitable for baking, mashing or roasting. Just one seed potato can produce a large yield of delicious crops to harvest again and again throughout the season.
Before you plant your seed potatoes, it is important to ensure they have been 'chitted', chitting encourages new shoot growth and helps to produce more crops. To chit your seed potatoes, place them in an egg box or shallow tray in a well-lit spot. Once you have a few shoots, it's time to plant out!
Let's get growing!
How to grow early potatoes

Step 1.
Pull a string line across the garden, run a handful of bonemeal along the line, this gives a straight line. Dig a trench to the depth and width of a spade, put the soil all to one side approximately 20 cm from the trench. This can be done in advance of the second stage which is to cut the grass.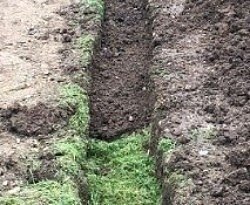
Step 2.
Place the fresh grass into the trench and cover with a layer of soil to about 5 cm or drag and drop a snippet from the panel on the right.
Step 3.
Place the chitted potatoes evenly along the trench, pushing each into the soil, cover so just the eyes are showing.
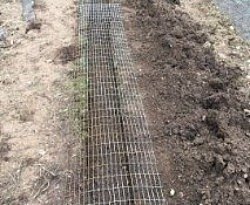
Step 4.
Lay wire over the trench to protect your potatoes from disturbance.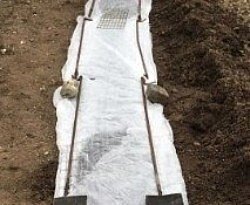
Step 5.
Lay fleece over the wire or canes and weigh down to prevent wind lift. Keep an eye on your potatoes to monitor their overall health.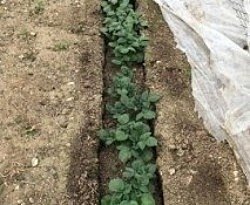
Step 6.
A few weeks later, lift the fleece to reveal young plants, use the soil to cover these plants by filling the trench, no need to raise the soil too high. When digging just work along the trench and it will be full of spuds!Related products

Bonemeal fertilisers
Bonemeal is rich in phosphorous for healthy root development and slowly releases nutrients.BUY NOW
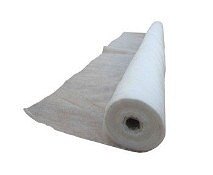
Horticultural fleecing
Fleece can be used to protect against cold, frost as well as other harmful weather conditions and pests.BUY NOW

Compost
We stock a huge variety of composts from specialist to peat free.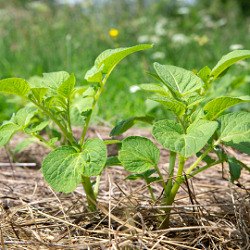
Mulch & Strulch
We stock quality mulch, from bark chippings to Strulch straw mulch, we have an option for all gardening tasks at hand.SHOP ALL MULCH & STRULCH
Comments (0)
Why not be the first to send us your thoughts?